Showing posts with label Christmas. Show all posts

Thursday, December 26, 2013

2nd Christmas in China

                                                                Card by tinyprints

This year's Christmas was much more normal than last year's strange Chinese worker jackhammering out our shower at 8:30 Christmas morning fiasco which lasted all day and inevitably left us opening presents well past Sal's bedtime. This year, we slept a bit later than usual, and all woke together. Nick grabbed his camera and went to the living room so he could capture Sal's reaction to Santa's visit.


I'm not sure he really "gets it" yet. I mean, he went from thinking the Duck Dynasty patriarch was Santa on a CNN news story, to  later seeing a Chinese Santa at  Christmas Eve dinner. Poor kid has got  to be confused. He knows Santa has a beard, and that's about it.

NZ and I have given up gift giving to one another while here  to simplify life ( and to be honest, there is nothing here in China that either of us want), but we did receive many thoughtful gifts from overseas. Sal made out like a bandit, and enjoyed his Mickey ball and Duplos from Santa. He also got his very own clock-the kid has a love for clocks and watches. It's quite funny to see how excited he gets when he spots a clock somewhere. 


We are happy to have survived our second Christmas here in China, and even more excited that we only have one more left before we can go back to our friends and family in California. 

Next on our agenda is getting healthy (Sal and I are both sick this week), then getting through New Years, having my sister arrive, giving birth to our daughter, NZ's birthday and Sal's birthday....all before mid January.


Tuesday, January 1, 2013

What we did on Christmas Vacation

Well, not exactly Christmas vacation, but PRC observes the New Year as a holiday, and includes a few extra days surrounding January 1st as off days. This means that NZ actually had a few days to relax and hang out with us. Nevermind the fact that when China has a few days off, they then work through the following weekend to make up for days off---so yes, NZ will be working 9 days straight this next week.

But, it's been great to have him home for a stretch of time. We've really enjoyed some lazy mornings playing video games, and cooking while Sal naps--then heading out for a walk or errands afterwards.

Here are some pictures of what we did on our Christmas vacation.

Sal got another haircut

Our sous chef hard at work

We walked by a city garden

NZ made meatuh-balls


We had our first snow watched TV in sweatpants
We saw a scooter driving down the escalator
And got lots of hugs from dad
A nice way to send 2012 out, and welcome in a New Year.

Saturday, December 8, 2012

Christmas Card 2012


This was my first year ever that I can remember not making my own cards. My sister and I usually get together during one of the first weekends in November, scrapbooking and stamp supplies in hand, and spend the day making cards. Unfortunately, the lack of supplies ( & my sister) here made it impossible for me to continue my tradition.
I did however, get some of my creative juices flowing by setting up a DIY photo backdrop (shout out to pinterest) out of balloons that I bargained for at "stuff mart". I taped them to the wall behind the boy. I borrowed a Santa hat from Mrs. Barcelona, baked a couple cookies and got down to the business of taking pictures...
..or so I thought....
See all the balloons on the floor? The two second tornado hit.
...before I could grab him, down came the balloons. I got a couple of shots before the boy went ape$hit on those things. He LOVES balloons. More specifically, he loves to see how tight he can squeeze them with his dagger like fingernails until they pop.

So, I had to act fast. I blew up a few more balloons and taped them back up while holding back a determined young man. I grabbed the plate of cookies, purposefully placed them at least four feet in front of where I planned to seat Sal ( to buy myself time to run and get my camera ready), then plopped him on his bottom and snapped away.

look how fast I can get to the cookies, mama!
hmm, Santa doesn't need TWO cookies. Maybe I can have one?

He wasn't so sure about the cookie at first. He is an observer. Always watching, always judging curious. Eventually, his curiosity partnered with my slow reaction time meant that he got his first taste of cookie.
Hey mama!!!!!Look!!!!! balloons on the floor.
You better go fix dem while I eat dis cookie.

I rained on his parade by taking it away, but his spirits quickly rose when I started pulling the balloons off the wall for him to chase around.
How bout a truce, baby?

oh yes, balloons are much better than cookies.

After a few hours choosing a layout on tinyprints.com, we had ourselves our 2012 Christmas card.


Warm wishes from our family to yours

Merry Christmas from the other side of the World. We love and miss our family and friends, and hope that you all have a wonderful holiday filled with good food, laughter and love!

Sunday, December 2, 2012

Christmas Tree

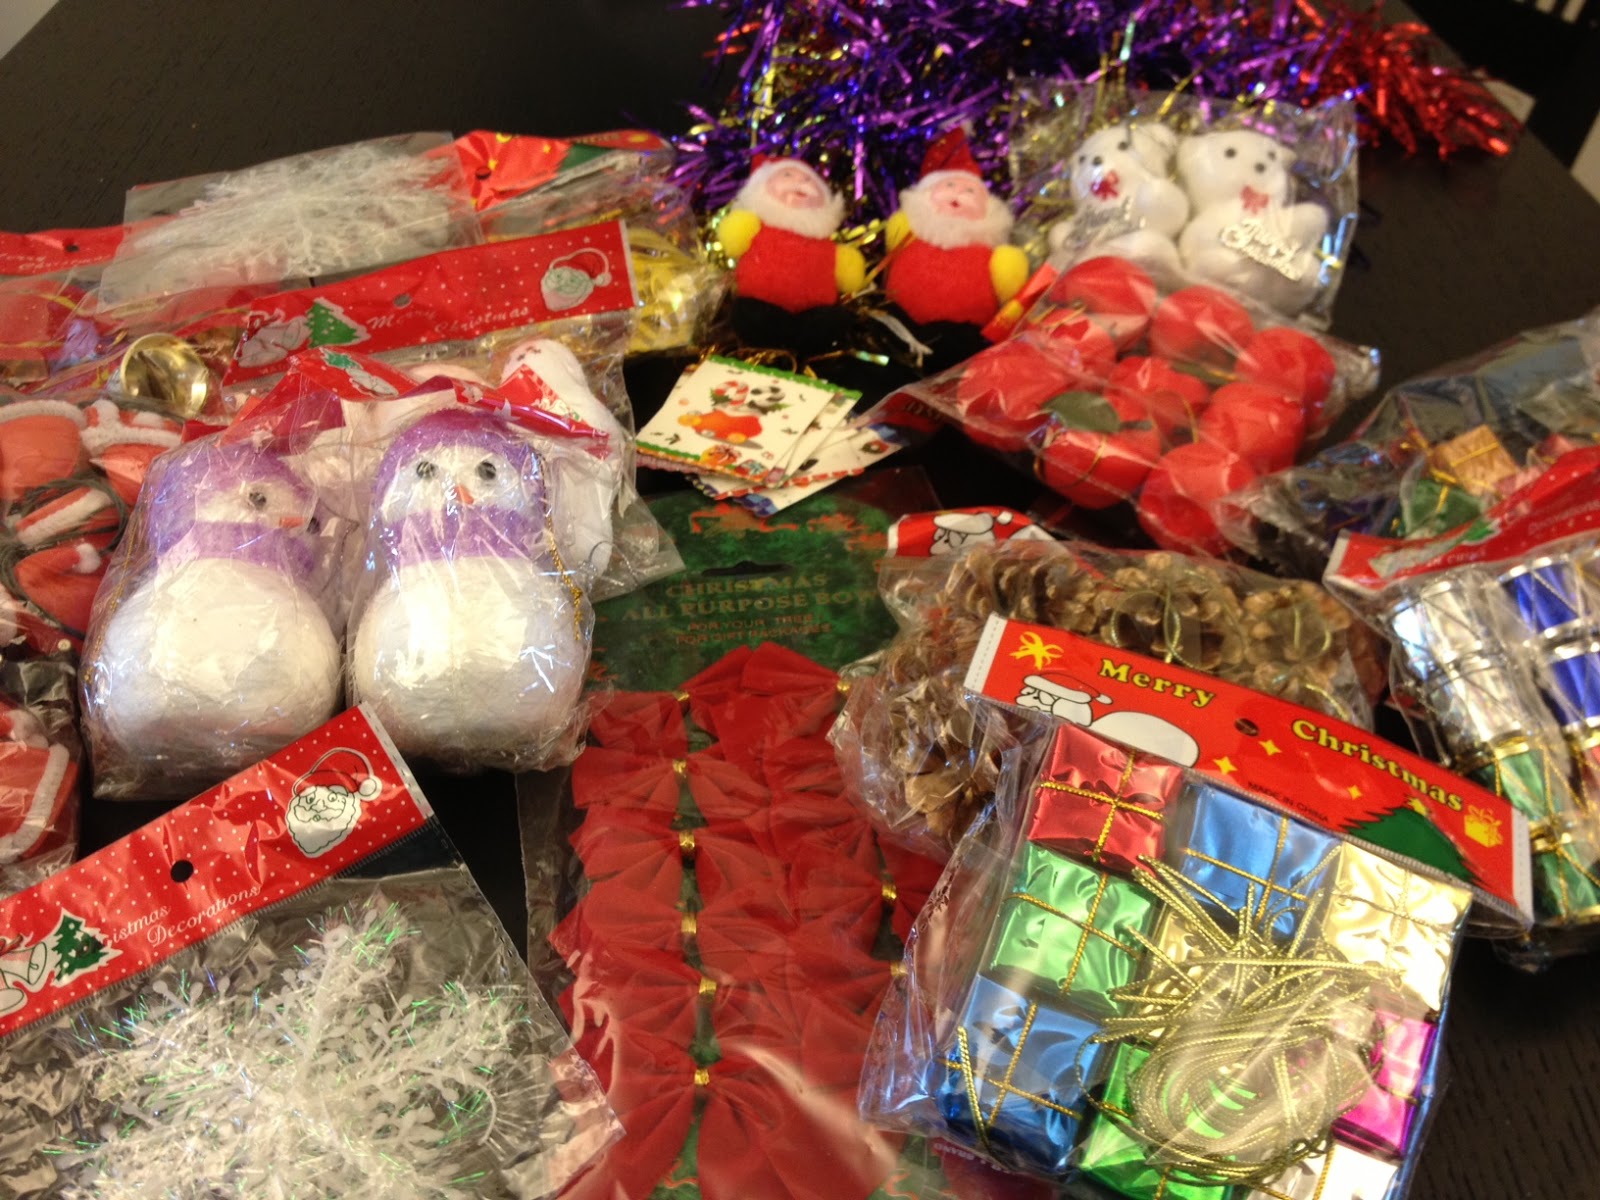
Looks like the Dollar Tree threw up on our table

Here in China, our Christmas tree, purchased off a chinese site which is a cross between amazon and eBay, came with lights, a fake tree which stands about 4 feet tall, and a HUGE bag of decorations that look like someone had a shopping Bonanza at the dollar tree.

It's not what we would have at home, by any means, but it is our tree this year, and Sal seems to dig it.


Thank goodness kids are so easy to please.


Saturday, December 1, 2012

Little Hands Wreath

 
Little Hands make perfect Christmas wreaths.
 
 
All I had to do was get Sal to hold still long enough to do a rough tracing of his hand to be used as a pattern. I cut out 9 little hands, overlapped them and glued them together ( which failed). My glue wasn't strong enough to hold them together, so I ended up stapling them, but if I were in the States I would have just used my glue gun or Aleene's craft glue. I had a left over bow from our Christmas Tree explosion that I topped the wreath with  and hung it from a 3M command hook which seems to be our ONLY option for hanging things here.
 
An easy, cheap way to commemorate baby's first Christmas.

Tuesday, January 3, 2012

Homemade Holidays: Paisano Horeshoes

NZ & his sister play a game of Paisano Horseshoes
In the spirit of keeping our Christmas gifts unique, NZ and I did our best to continue our streak of making Christmas gifts. Last year, NZ made fishing poles for a few lucky recipients, and this year, he and I found ourselves at Home Depot, loading up on materials to make a couple of fun backyard games for our Christmas "picks".

It took him a few weeks from start to finish, and he even learned how to lay and tack carpeting down in the process while covering the boards, which were made out of pressure treated wood and 2x4's. He's pretty crafty, that ol man of mine.

The Zentil family ( all of them, not just the immediate Zentils) love their games. Every year in Yosemite, there are a couple of games of cribbage going at any given time, using a cribbage board that Nick's grandfather made long ago. We all enjoy word games, board games, and anything interactive. At our wedding "after party", a rousing game of Bocce Ball was played in my father-in-law's backyard until it got too dark to continue.

So, NZ and I decided that a couple of "Paisano Horseshoe" games would be a good gift for our family members. The game is usually called "Mexican Horseshoes" or "Washer toss", but to keep in the spirit of being Italian, I just renamed it. So there you have it, it's now called Paisano Horseshoes, and I'm stickin' to it.

NZ's sister, Breakin' in her new game
 Looking forward to watching these boards get years upon years of use, and good family memories made in the meantime.


Tuesday, December 27, 2011

Homemade Holiday: Quiet Book

A couple years back, I made our first born nephew a quiet book when he turned three. This year, one of our other nephews also turned three, and seems to be drawn to my childhood quiet book every time he comes over to "Uncle Nick's house". So, I decided that I would make him his very own book and give it to him for Christmas. I call this one Quiet book 2.0, since I have made some changes to my original pattern.


The main change I made with this book, was that I opted to use felt for the pages, like my friend Liz , over at A crafty B, did for her daughter's book. The felt just feels sturdier, and is easier to snap, button, and velcro to, than the quilting cotton that I used on my first version.

I like quiet books because they work on a child's fine motor skills, and they can go at their own pace. Some pages are meant to be challenging, with things like lacing, or weaving, and others focus on color recognition, counting, and day to day tasks, such as snapping, buttoning and using velcro.

Upon completion of the pages, I made a canvas cover complete with carrying handles, so our nephew can take his book on-the-go.

I hope it provides hours of entertainment ( & some quiet time for his mama!) for years to come.

Wednesday, December 21, 2011

Still on fast forward

I'm going to be real, and honest here.

I thought that once I had a baby, or was at least pregnant again, that I would once again feel the excitement over the Holiday season..

Yet, here I sit, once again, wishing this season would be as easy to fast forward through as commercials during a DVR'd episode of Pan Am.

Totally not what I expected.

I remember after Halloween was over, feeling excited for Thanksgiving, Black Friday deals, Christmas decorating and gift buying.

That was.... until I was put on restriction the first week of November.

No excess activities. One errand a day, max.

Totally threw a wrench in my plans..In my perfect world, I would be done with work as of November 1st, and would have time ( & energy) to visit friends, shop, decorate and really just relax and enjoy having freedom to do whatever I wanted before we learn about sleep deprivation, midnight feedings, and 2 minute showers.

Right now my reality is sleeping in, moving from our bed to the sofa, and deciding what errand I will go on to get some human interaction that day--and fearing that if I overdo anything, our son will be born early. I am back to wanting a fast forward button through the Holidays, just so we get to the day where we get to meet our son, and know that he's here alive and well.

Once he gets here, time can stand still. That'd be alright by me.

Friday, November 25, 2011

Make it: Starbright Wreath


Oh Dollar Tree, how I love thee...

Take a look at my $3 wreath.

All it took was:
  • styrofoam wreath form ( $1)
  • 2 packages of starbright mints ($1x 2 bags= $2)
  • glue (already had on hand)
  • Clear coat spray (already had on hand)
And as with anything I do, there was a learning curve while making this wreath. I decided to cheap out and use a thin coat of modpodge, instead of using a glue gun to adhere the mints to the wreath.

It worked, but the drying process was long and slow ( took about a week), and the wreath lived on my kitchen table during that time. Had I used a glue gun, it would have qualified as a one evening project, hook, line and sinker.

So, although my wreath was made using modpodge, I will do the tutorial as though a glue gun was used. Seriously, it would have been soooo much easier had I used one. My Slurpee definitely helped manage my frustration levels.

Instructions:
  • Clear workspace
  • Line workspace with wax paper
  • Unwrap mints
  • Starting at the bottom inner edge of the wreath, start gluing mints side by side.
  • As you start the second row, alternate the mints so that they fill in the little gaps
  • Continue until entire wreath is covered in mints
  • Spray clear coat spray over wreath in a well ventilated area ( outside!)
  • Let dry, and repeat clear coat making sure every nook and cranny is coated. This step is super important so that the wreath does not get sticky when hung in damp weather.
  • Pin a ribbon into the back of the wreath form, and enjoy!

Sunday, September 26, 2010

Afternoon Project: Christmas Tree Skirt

The weather man warned us that we would see triple digits this weekend, but I was skeptical. He was right, I was wrong. Our truck read 101 degrees at noon today. What better reason to stay inside, pull out the sewing machine, turn on some football ( GOOOO Steelers 3 and 0 now!) and do an afternoon project. And, while we're at it, why not make it a Christmas project?


So, that's exactly what I did. I found a super duper cute pattern over at Sew4home.


I love the Heather Bailey prints that she used, however, I am on a budget, and can't afford to fork out $10/yd for those prints. Instead, I used JoAnn's Christmas fabric which was on sale for 30% off today. Although you can go to Sew4Home's website and follow their step-by-step instructions, I made some simplfications to my pattern ( omitted using bias tape-this saving $$$ and time).

You will need:

  • 5/8 yd. of 4 coordinating fabrics or 3/4 yd of 8 coordinating fabrics

  • 1 1/2 yd. of 46"wide muslin ( I pieced scraps of 1 1/2 yd of 36"wide muslin together)

  • scissors

  • sewing machine with a straight stitch

  • thread

  • measuring stick

  • 26x26 paper to make a pattern

  • pins

  • marking pencil

  • string

INSTRUCTIONS ( sort of...go to Sew4home for really good directions)

  1. Pick out fabric. I used 5/8yd of 4 coordinating fabrics to keep cost down. 2. To make pattern piece. Follow diagram below. Photo credit: Sew4home.


3. Fold 5/8yd fabric in half. Lay pattern piece and pin. Cut. Repeat for remaining 4 fabrics.


4. Arrange your wedges into an appealing pattern.
5. Sew each wedge to the one next to it. Leave the last wedge unsewn. Press seams open.

6. Lay the completed 8 wedges right side down over your 46" square of right side up muslin ( again, I had to piece muslin together to make a square). Smooth out both upper and lower fabric pieces and pin. Cut muslin using the skirt as a guide. Sew around perimeter, remove pins and turn right side out.


7. Press perimeter of skirt and pin so that muslin does not peek out under the print fabric. Sew a strightstitch around perimeter of the skirt. There will be raw edges left open on two of your wedges. Turn them under, pin and press. Sew with a strightstitch.

8. Using a 6" circle ( I used a pot lid), center it over skirt, trace and cut around guide. Turn each raw edge under and pin. Sew with a straightstitch.

9. Remove all remaining pins and press. There you go. A Christmas Tree skirt for under $20.


Do you think September is too early to get a tree? I can't wait to see it wrapped around ours this year!